Some may be concerned whether doing so would slow down the SVN communications. The answer is yes, but if only work with source code then the effects are negligible. Just use SSH as SVN protocol tunnel scheme and if it slows you down too much then remove it!
Step 1: Install TortoiseSVN
Google and download and install TortoiseSVN. After you finish installation make sure C:/Program Files/TortoiseSVN/bin/TortoisePlink.exe exists. TortoisePlink.exe is the executable you'll need to make everything work.
Putty does NOT work!
You are advised to add SSH tunnel to your communication with the SVN server so that nobody can hijack your code. You don't want your award winning code to leak out do you?
Step 2: Generate a .ppk Key
If you haven't done it go to your AWS console and generate an RSA key pair. The private key ends in .pem. Download the private key and use PuTTYgen to generate the corresponding .ppk key. Put your key somewhere safe. Let's use C:/my-ec2-key.ppk for your .ppk key and C:/my-ec2-key.pem for your .pem key.
A .pem key is an RSA private key. A .ppk key is the equivalent key in a format that OpenSSH can understand. OpenSSH is an implementation of the SSH algorithm.
This should already be the case, but make sure your public key exists in /home/ubuntu/.ssh/authorized_keys. The public key should begin with 'ssh-rsa' and end with your key pair's name.
Step 3: Edit SVN Configuration File
If you are using Windows 7 or Windows Vista it should be located at C:\Users\
ssh = C:/Program Files/TortoiseSVN/bin/TortoisePlink.exe -i C:/my-ec2-key.ppk
Save your changes. My subversion configuration file looks like this:
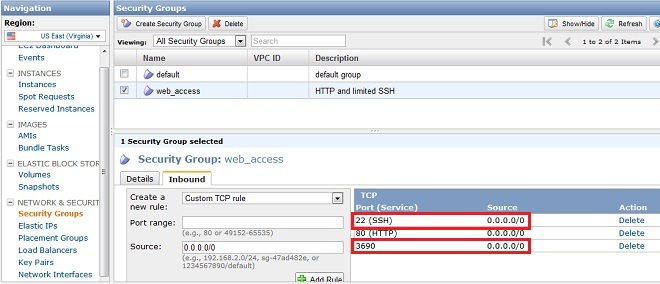
### This file configures various client-side behaviors.
###
### The commented-out examples below are intended to demonstrate
### how to use this file.

### Section for authentication and authorization customizations.
[auth]
### Set store-passwords to 'no' to avoid storing passwords in the
### auth/ area of your config directory.  It defaults to 'yes'.
### Note that this option only prevents saving of *new* passwords;
### it doesn't invalidate existing passwords.  (To do that, remove
### the cache files by hand as described in the Subversion book.)
# store-passwords = no
### Set store-auth-creds to 'no' to avoid storing any subversion
### credentials in the auth/ area of your config directory.
### It defaults to 'yes'.  Note that this option only prevents
### saving of *new* credentials;  it doesn't invalidate existing
### caches.  (To do that, remove the cache files by hand.)
# store-auth-creds = no

### Section for configuring external helper applications.
[helpers]
### Set editor to the command used to invoke your text editor.
###   This will override the environment variables that Subversion
###   examines by default to find this information ($EDITOR,
###   et al).
# editor-cmd = editor (vi, emacs, notepad, etc.)
### Set diff-cmd to the absolute path of your 'diff' program.
###   This will override the compile-time default, which is to use
###   Subversion's internal diff implementation.
# diff-cmd = diff_program (diff, gdiff, etc.)
### Set diff3-cmd to the absolute path of your 'diff3' program.
###   This will override the compile-time default, which is to use
###   Subversion's internal diff3 implementation.
# diff3-cmd = diff3_program (diff3, gdiff3, etc.)
### Set diff3-has-program-arg to 'true' or 'yes' if your 'diff3'
###   program accepts the '--diff-program' option.
# diff3-has-program-arg = [true | false]

### Section for configuring tunnel agents.
[tunnels]
### Configure svn protocol tunnel schemes here.  By default, only
### the 'ssh' scheme is defined.  You can define other schemes to
### be used with 'svn+scheme://hostname/path' URLs.  A scheme
### definition is simply a command, optionally prefixed by an
### environment variable name which can override the command if it
### is defined.  The command (or environment variable) may contain
### arguments, using standard shell quoting for arguments with
### spaces.  The command will be invoked as:
###   <command> <hostname> svnserve -t
### (If the URL includes a username, then the hostname will be
### passed to the tunnel agent as <user>@<hostname>.)  If the
### built-in ssh scheme were not predefined, it could be defined
### as:
# ssh = $SVN_SSH ssh
ssh = C:/Program Files/TortoiseSVN/bin/TortoisePlink.exe -i C:/my-ec2-key.ppk
### If you wanted to define a new 'rsh' scheme, to be used with
### 'svn+rsh:' URLs, you could do so as follows:
# rsh = rsh
### Or, if you wanted to specify a full path and arguments:
# rsh = /path/to/rsh -l myusername
### On Windows, if you are specifying a full path to a command,
### use a forward slash (/) or a paired backslash (\\) as the
### path separator.  A single backslash will be treated as an
### escape for the following character.

### Section for configuring miscelleneous Subversion options.
[miscellany]
### Set global-ignores to a set of whitespace-delimited globs
### which Subversion will ignore in its 'status' output, and
### while importing or adding files and directories.
# global-ignores = *.o *.lo *.la #*# .*.rej *.rej .*~ *~ .#* .DS_Store
### Set log-encoding to the default encoding for log messages
# log-encoding = latin1
### Set use-commit-times to make checkout/update/switch/revert
### put last-committed timestamps on every file touched.
# use-commit-times = yes
### Set no-unlock to prevent 'svn commit' from automatically
### releasing locks on files.
# no-unlock = yes
### Set enable-auto-props to 'yes' to enable automatic properties
### for 'svn add' and 'svn import', it defaults to 'no'.
### Automatic properties are defined in the section 'auto-props'.
# enable-auto-props = yes

### Section for configuring automatic properties.
[auto-props]
### The format of the entries is:
###   file-name-pattern = propname[=value][;propname[=value]...]
### The file-name-pattern can contain wildcards (such as '*' and
### '?').  All entries which match will be applied to the file.
### Note that auto-props functionality must be enabled, which
### is typically done by setting the 'enable-auto-props' option.
# *.c = svn:eol-style=native
# *.cpp = svn:eol-style=native
# *.h = svn:eol-style=native
# *.dsp = svn:eol-style=CRLF
# *.dsw = svn:eol-style=CRLF
# *.sh = svn:eol-style=native;svn:executable
# *.txt = svn:eol-style=native
# *.png = svn:mime-type=image/png
# *.jpg = svn:mime-type=image/jpeg
# Makefile = svn:eol-style=native
Step 4: Make sure port 22 is NOT Blocked!
If you haven't in your AWS control panel add a TCP rule that opens up port 22 for public access. Again here's the screenshot:
Step 5: Checkout Files from SVN!
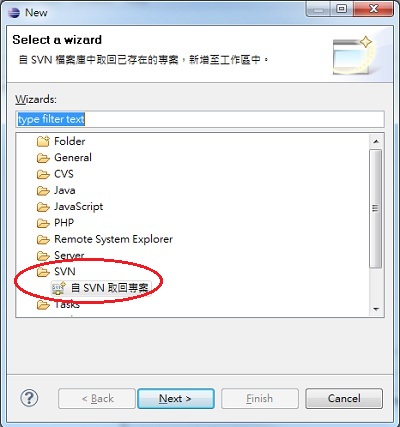
Install Subclipse if you haven't. Inside Eclipse in PHP Explorer right click your mouse and select New -> Other and pick SVN. Here's a screen shot:
Click Next. Select 'Create a New Repository' and click Next. In the Url field type 'svn+ssh://ubuntu@23.2.1.2/svnrepos/repository'. Click Next and everything should just work. If you are prompted with a dialog form then enter your user name 'ubuntu' and private key file path 'C:/my-ec2-key.pem'. If it doesn't work try 'C:/my-ec2-key.ppk' as the key file path.
Does /svnrepos/conf/passwd still matter? Now you are using RSA key infrastructure to identify yourself. When Eclipse tries to connect to the SVN server it uses C:/my-ec2-key.ppk (your private key) in the encrypted communication with the SSH server, which uses the public keys in /home/ubuntu/.ssh/authorized_keys. Therefore /svnrepos/conf/passwd NO longer applies. You can remove the line 'ubuntu = ubuntupassword' and everything would still work.
If you have any questions let me know and I will do my best to help you!
◀ Checkout an SVN Project In Eclipse For Development

