Amazon
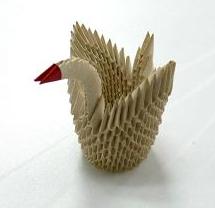
Here is the general procedure of making an easy origami swan like the one in the photo.
Get Materials
A swan is white, so white paper is generally enough. If you want to go for a different color you can. The beak of the swan should be of a different color, like red. When you get good at this you can also add bells and whistles to your work. For example, you can add fake eyes and glitter
Measure and Cut Paper
The goal here is to cut paper into rectangular pieces that you will be folding into basic parts. You need at least 150 basic parts to make a swan. For each basic part, the proportion of width versus height is 3 : 2. If you want to make a small swan, each part can measure 4.5cm by 3cm. If you want to make a bigger one, you can go 6cm by 4cm or even bigger.
Make Basic Parts
You fold each piece of paper into the basic part which is the basic construction piece. How many depends on your design and size. I'd say you need at least 150 pieces. If you want to do something elaborate it can go up to 1000 pieces.
Assembly
Assemble the basic pieces into a swan. You don't need to glue the body, but you need to glue the neck and maybe the top part of the wings to make them stay. I use white glue, but you can use any glue you want!
Post Process
This is purely personal and depends on your design. You can decorate it by putting some things on the body such as glitter, whistles, fake eyes, etc. If you do be careful not to overdo it because it may look too fancy! A swan should be simple and white shouldn't it?
Next we'll look at how to make basic parts and assemble them!
Questions?
◀ Origami Swan TutorialMaking Origami Swan Basic Part ▶

