Step 1
Download the latest WAMP from WAMP's website. It is a Windows executable and its name should be something like this: wampserver2.5-Apache-2.4.9-Mysql-5.6.17-php5.5.12-32b.exe.
Step 2
Export all databases except the default MySQL databases. As for version 5.5.20, the default MySQL databases include information_schema, mysql, performance_schema, test. Therefore export each database other than them into a single MySQL dump. Here's the MySQL command to export three databases:
mysqldump -uroot -pmypassword --databases db1 db2 db3 > D:\three-databases.sql
Or you can use PhpMyAdmin to do that.
Exit the old WAMP manager so that every WAMP service is shut down. If you are running MySQL's daemon, kill the mysqld.exe in Windows Task Manager (by pressing Ctrl Shift ESC).
Step 3
Create a new folder for new WAMP files. Double click WAMP's executable to run it. When you get to the 'Select Destination Folder' step select that new folder.
In my situation my old WAMP folder is C:\wamp2.0 and the old MySQL executable is C:\wamp2.0\bin\mysql\mysql5.1.36\bin\mysqld.exe. My new WAMP folder is C:\wamp2.2 and the new MySQL executable is C:\wamp2.2\bin\mysql\mysql5.5.20\bin\mysqld.exe.
Go through the rest of the installation until you are done.
Step 4
Once you are done, your new MySQL database will be brand new, meaning your root user will have no password. So if you want to set up a new password for root, follow these steps.
1. In the Windows menu tray, left click on WAMP icon and go to MySQL -> MySQL console
2. When you get a prompt "Enter password:", press Enter.
3. Run these commands:
SET PASSWORD FOR 'root'@'localhost' = PASSWORD('newpassword');
exit
2. When you get a prompt "Enter password:", press Enter.
3. Run these commands:
SET PASSWORD FOR 'root'@'localhost' = PASSWORD('newpassword');
exit
Edit PhpMyAdmin's configuration file to update the root's password. This file should be located at a path similar to C:\wamp2.5\apps\phpmyadmin4.1.14\config.inc.php.
$cfg['Servers'][$i]['password'] = ''; => $cfg['Servers'][$i]['password'] = 'newpassword';
Step 5
Run the new WAMP manager. In a web browser, go to http://localhost/phpmyadmin/ and you should be able to see the default MySQL databases. Import your own databases by clicking Import. Follow the prompts.
You are done! If that didn't go well look further for troubleshooting.
Troubleshoot
Let's suppose you forgot to export old databases. You'd like to run the old WAMP executable to export the old databases. When you run the old WAMP instance, however, you still see the new database
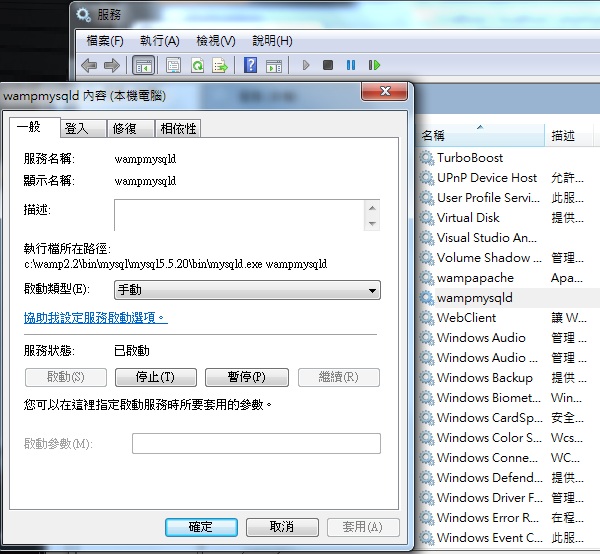
Here's a fact. During the installation of new WAMP, 'mysqld', or the MySQL daemon, has been registered as a windows service. When you run the old WAMP or the new WAMP executable it simply starts that service. Here is a screenshot of this service:

As you can see the WAMP's mysql daemon's target is C:\wamp2.2\bin\mysql\mysql5.5.20\bin\mysqld.exe, not the old mysqld.exe which is C:\wamp2.0\bin\mysql\mysql5.1.36\bin\mysqld.exe. By starting WAMP you are always running C:\wamp2.2\bin\mysql\mysql5.5.20\bin\mysqld.exe, not C:\wamp2.0\bin\mysql\mysql5.1.36\bin\mysqld.exe. The MySQL server listens for incoming connection at port 3306, and you will always see the new databases when your PhpMyAdmin instance makes a connection to the MySQL server.
An easy way to solve the issue is stop this service by pressing Stop button. Then open up a command window and type C:\wamp2.0\bin\mysql\mysql5.1.36\bin\mysqld.exe or wherever your old mysqld.exe lives, to start the old MySQL server listening on the same port, 3306. Then access your databases via PhpMyAdmin again and you should be able to see old databases. Export them and you know what to do.
Related Article
Upgrade WAMP WITHOUT Losing MySQL Database Records in SECONDS!
Upgrade WAMP WITHOUT Losing MySQL Database Records in SECONDS!
Any questions? Let me know!


