My Java Eclipse IDE's version is as follows:
Eclipse IDE for Java Developers
Version: Helios Service Release 1
Build id: 20100917-0705
Follow the following steps to install and configure Eclipse correctly.
Step 1: Download the latest version of Eclipse IDE
Download the latest version of 32-bit Eclipse IDE for Java Developers from Eclipse's download website at http://www.eclipse.org/downloads/. Unzip eclipse-java-helios-win32.zip and save contents to C:\eclipse-java-helios-win32\.
Even if you are using a 64-bit machine you still should download 32-bit version of both Eclipse and Java JDK otherwise you'll get the following error:
Failed to load the JNI shared library "C:\Program Files(x86)\Java\jdk1.6.0_20\bin\..\jre\bin\client\jvm.dll"
Step 2: Run Eclipse
Before running Eclipse I'd recommend that you open Eclipse configuration file and increase the memory settings so that Eclipse runs faster. Here's my eclipse.ini (located in same folder as eclipse.exe):
-startup
plugins/org.eclipse.equinox.launcher_1.1.0.v20100507.jar
--launcher.library
plugins/org.eclipse.equinox.launcher.win32.win32.x86_1.1.1.R36x_v20100810
-product
org.eclipse.epp.package.java.product
--launcher.defaultAction
openFile
--launcher.XXMaxPermSize
1024M
-showsplash
org.eclipse.platform
--launcher.defaultAction
openFile
-vmargs
-Dosgi.requiredJavaVersion=1.5
-Xms500m
-Xmx500m
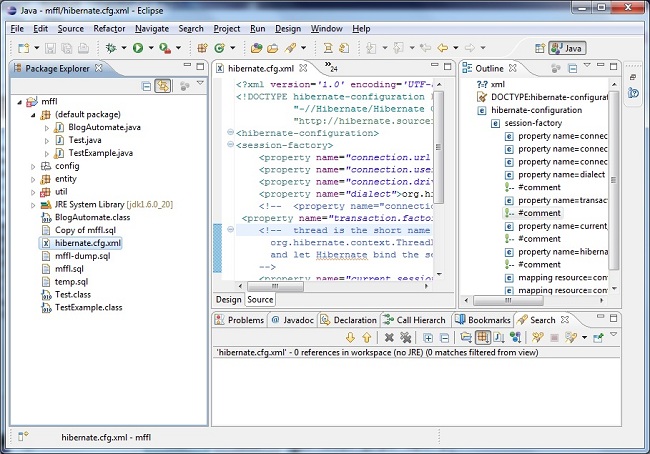
Then run Eclipse by clicking C:\eclipse-java-helios-win32\eclipse.exe. Its user interface, known as a workspace, looks like the following:

Step 3: Create a New Project and Setup JRE
Create a new Java project and specifies the root of the code base as the project Location. One thing you should do is use the JRE you installed earlier instead of the JRE that comes with Eclipse. Follow the following steps:
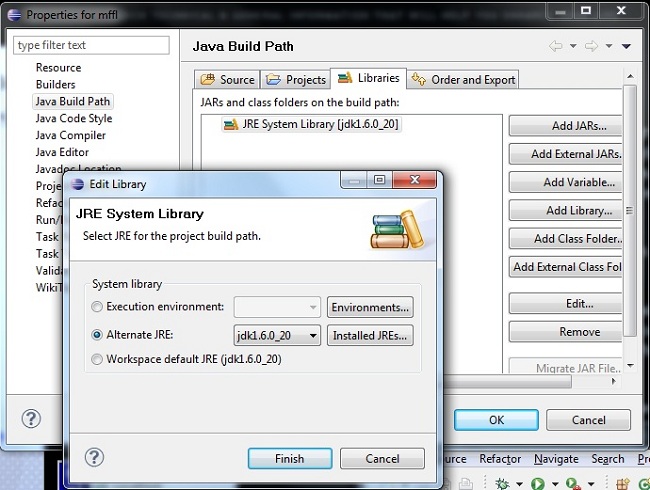
Project -> Properties -> Java Build Path -> Click 'JRE System Library [jre6]' -> Libraries -> Edit... -> Alternate JRE -> Installed JREs -> Add... -> Standard VM -> Navigate to C:\Program Files (x86)\Java\jdk1.6.0_20\jre in 'JRE home' text field -> Finish (note every jar in C:\Program Files (x86)\Java\jdk1.6.0_20\jre is listed in 'JRE system libraries' -> pick jdk1.6.0_20 in 'Alternate JRE' drop down menu.
The actual window looks like:

These steps provide the correct JRE for the code you run in eclipse. If something is not resolved simply drop the corresponding Java jar in C:\Program Files (x86)\Java\jdk1.6.0_20\jre\lib\ext and restart Eclipse and the unresolved should become resolved! This is because Eclipse now understands C:\Program Files (x86)\Java\jdk1.6.0_20\jre is the JRE that should be used, and therefore Eclipse will look into C:\Program Files (x86)\Java\jdk1.6.0_20\jre\lib\ext for any external jars to resolve the unresolved packages or libraries!
Alternatively you could've used the original JRE that comes with Eclipse installation. Suppose the original JRE is C:\Program Files (x86)\Java\jre6. Then you would put external jars in C:\Program Files (x86)\Java\jre6\lib\ext folder. If your Java code base is compatible with the original JRE then this approach will work.
Congratulations! You've successfully installed Apache, MySQL, PHP, Java, Hibernate, and Eclipse IDE for Java. You are ready to crank out some serious killer app! Questions? Let me know!
◀ Install and Configure Hibernate


