 Amazon
 In this post you will be learning what kind of tools are needed to carve wood. I'll also introduce the basics of wood carving and a general procedure to follow to produce a piece of wood artwork. Let's proceed!
Introduction To Wood Carving: Tools
As far as I know there are not many wood carving tools to master in the world of wood carving. Essentially you just need to be able to make cuts and chisel away wood.
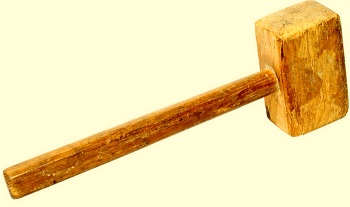
Amazon A mallet is a wood hammer that you pound on top of another tool to make a cut. We usually use it to make stop cuts with a chisel. One looks like the following:
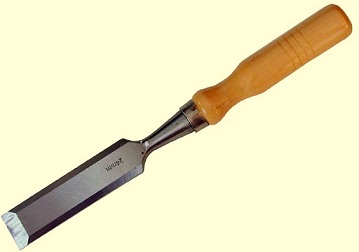
Amazon A chisel is often used to make "stop cuts" so that you can use other tools to take out wood not beyond the stop cut. It comes with different sizes. Some are completely straight (used to make stop cuts and smooth out the background) and others are bent toward the middle (used to cut wood). Here's a chisel:
AmazonA V tool looks like a "V". It comes with different sizes as well, and the purpose is to cut a trench. Note you can also use it to make stop cuts if your design calls for it. Here's what a V tool looks like:
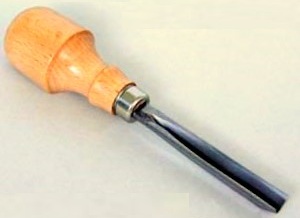
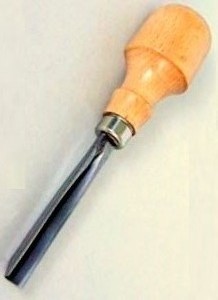
Amazon A U tool looks like a "U". It comes with different sizes as well, and the purpose is to gouge wood. Note you can also use it to make stop cuts if your design calls for it. You may not discern the difference between a U tool and a V tool, but here's what a U tool looks like:
These wood carving tools are enough to get you started and will be the main tools for the remainder of your wood carving career. So mastering them is your top priority!
Introduction To Wood Carving: General Procedure
In general, wood carving falls into two categories: carving on a flat piece of wood and leaving the other side untouched (called Bas-relief or "raised pattern"), and carving all around the wood into whatever shape you want. Due to time constraints we only did a piece in the first category. Here is a process of making a Bas-relief piece:
Make a Pattern: Pick a design and draw your design on a flat piece of wood. We used mahogany but you can use other types of wood like ebony wood. You can also draw your design on tracing paper on top of the wood so that you leave your design on the tracing paper as well as on the wood. Then you will be able to have reference to your design while carving on the wood.
Carve Away: You use different wood carving tools to carve and chisel on your wood. You can refer to the previous section on the tools we used and what each does. In general, you use a V tool to cut a shallow trench just outside the pattern lines, and you use a wide chisel to make stop cuts at the borders. Then you use various tools to take out the wood between the borders and the pattern lines. Then you work on the pattern
Post Process: Once you are done, you can sand it with sandpaper or a sanding machine, to smooth out the edges. Or you can stipple some pattern on the background. It's really up to your taste. I prefer a smooth background, but some people prefer a rough background. Then you can put a layer of finish or wax on it, to make it last longer and protect it from mold.
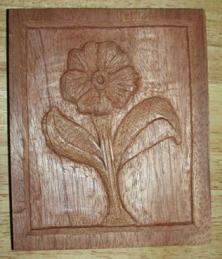
Introduction To Wood Carving: Wood Flower
This is the first wood carved piece I made
This wood carved flower took me 3 weeks, 3 hours per week, to finish.
Introduction To Wood Carving: Conclusion
Wood carving is nothing to be scoffed at. It takes a lot of patience, effort, and time to complete a piece. When you are carving, you really need to be careful with how much pressure you apply. You put enough pressure to take out the wood you don't want, and you stop to prevent taking out the wood you want to keep. If you are being sloppy about it chances are you will end up a messy piece.
The wood carving techniques I really want to learn is the second category - carving the wood into whatever shape you want. I want to make little wood animals like carved bears or carved fish. Hopefully in the near future I will find classes like this where I live and will be able to expand this section with more thoughts and pictures of more pieces!!
Questions? Let me know!

